Growing cannabis indoors is one of those things that looks complicated from the outside and clicks surprisingly fast once you understand the logic behind it.
I have tried to cover everything, from setting up your grow space and choosing the right LED light to managing your environment, training your plant, feeding it correctly, and understanding what actually drives yield.
From a forgiving autoflower to a Jolly Rancher strain known for its sweet flavor, the fundamentals stay the same.
My goal is to give you a clear, structured foundation, the kind that saves you from expensive mistakes on your first run and sets you up to improve with every growth after it.
Cannabis Growing Basics for Beginners
Indoor growing means one thing: full control. No seasons, no weather, no variables you did not put there yourself. What your plant gets is exactly what you give it.
That control comes down to six fundamentals:
- A grow space that is light-tight and ventilated
- A light source, specifically an LED, that replicates the wavelengths your plant actually needs
- A growing medium, whether soil or coco, that gives your roots somewhere to live
- Nutrients delivered in the right ratios at the right stage
- Water as the delivery vehicle for nutrition
- Climate control, covering temperature, humidity, and airflow
Every section in this guide builds directly from these six things.
Choosing Your Seed Type Before Anything Else
One decision beginners overlook until they are already in trouble: seed type. There are three categories, and the one you choose shapes your entire growth.
| Seed Type | How It Flowers | Best For |
|---|---|---|
| Autoflowering | Flowers based on age, not light schedule. No light flip needed. | First-time growers. Faster cycles (8–10 weeks). Forgiveness of mistakes. |
| Feminized | Flowers when the light is switched to 12/12. Always female. | Growers who want to control veg time and maximize yield. |
| Regular | Flowers on 12/12. Produces both male and female plants. | Breeders only. Not recommended for beginners. |
For a first grow, feminized autoflowering seeds are the clearest starting point. They remove the need to flip the light schedule and eliminate the risk of accidentally growing a male plant that pollinates your entire crop.
Most reputable seed banks sell feminized autos with a germination guarantee.
If you go with feminized photoperiod seeds, you will need to identify and remove any male plants before they release pollen.
Males develop pollen sacs instead of white hairs (pistils) at the nodes. Check your plants at the start of the flowering stage and pull anything that is not showing pistils.
How to Grow Cannabis Indoors
Before anything goes into the soil, everything needs to be in place. Here is the full process, from seed to harvest, in clear steps.
What You Need Before You Start
- Grow tent
- LED light
- Exhaust fan
- Clip fan
- Growing medium
- Pot
- Seeds
- Nutrients
- pH meter
- Hygrometer
- Timer
- Spray bottle
Startup cost: A basic first grow setup covering all of the above typically runs between $300 and $500.
You can go leaner with a 2×2 tent and a 100W quantum board light, or invest closer to the $500 mark for a 3×3 setup with better airflow control.
The seeds and nutrients are ongoing costs; the equipment is a one-time investment.
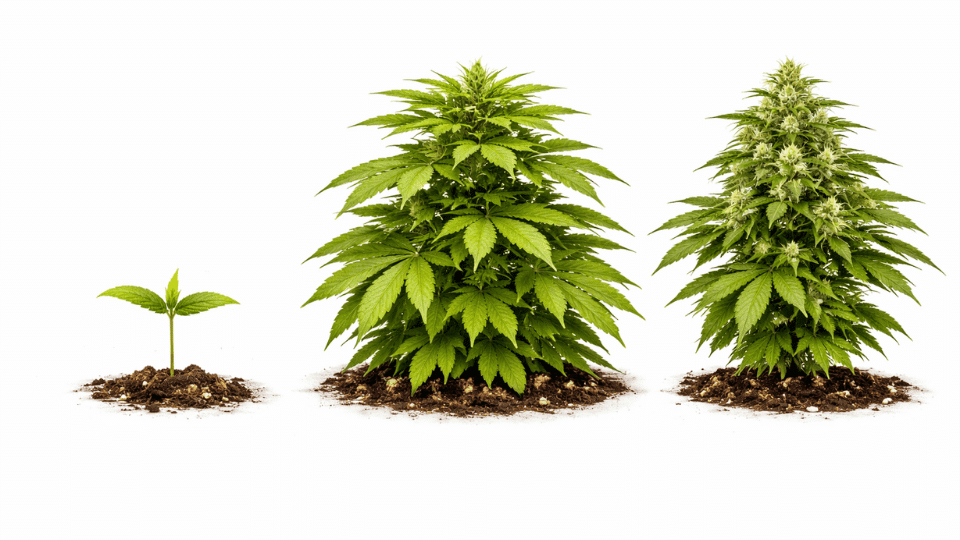
Step 1: Germinate Your Seeds
Place your seed between two damp paper towels on a plate and keep it somewhere warm, around 22–25°C.
Check every 12 hours. Within 24–72 hours, a small white taproot will emerge. Once it reaches about 1cm, it is ready to move into medium. Do not let it grow longer than that, or it becomes fragile to handle.
Step 2: Set Up and Start Your Seedling
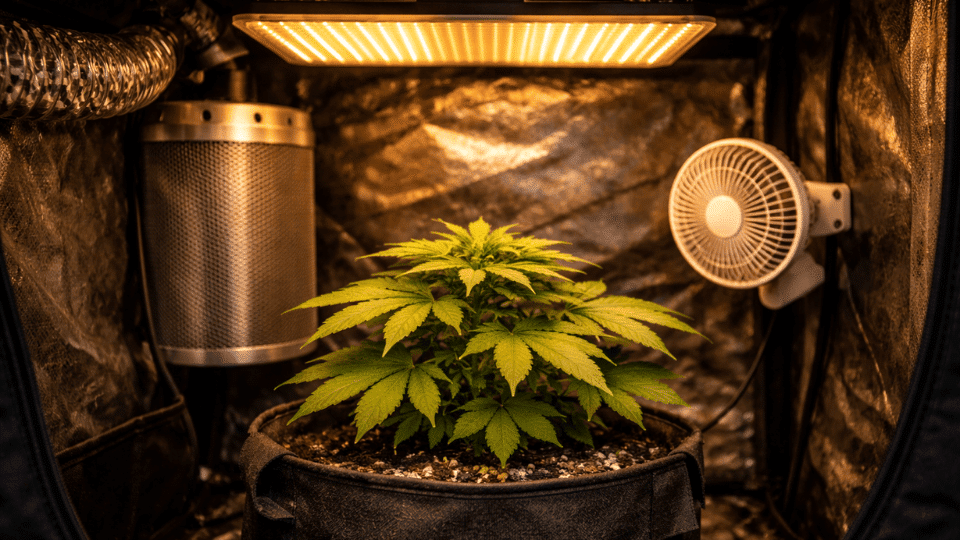
Assemble your tent and hang your LED at around 60–70cm above where your pot will sit. Install your exhaust fan at the top, connected to your carbon filter, and clip your circulation fan to a lower bar.
Make a small hole about 1cm deep in your moist growing medium, place the germinated seed taproot-down, cover lightly, and mist the surface.
Set your timer to 18/6, keep the humidity at 65–70%, and keep the temperature at 22–26°C. Your seedling will surface within 2–5 days.
Electrical safety: Water and electricity are close neighbors in a grow tent. Use GFCI outlets wherever possible, keep power strips mounted off the tent floor, and never let plugs or extension cords sit in water that has pooled. This is not optional.
Step 3: Grow and Train Through Vegetation
Once your plant has 3–4 sets of leaves, it is in full veg. Keep the 18/6 cycle running, raise your LED to maintain 40–50cm from the canopy, and start shaping your plant.
Take the longest branches and gently bend them outward, then secure them with soft ties or clips. This is LST, and it flattens your canopy so every bud site gets even light.
Check your ties every few days as the plant grows. Keep feeding and watering.
Step 4: Flip to Flower
When your plant reaches roughly half the final height you want, change your timer to 12/12. This light shift triggers flowering, and within 1–2 weeks, you will see the first bud sites forming.
Drop the humidity to 40–50% to prevent mould as buds develop. Your nutrient profile changes here, too. The feeding and irrigation requirements are discussed in detail in later sections.
Step 5: Harvest the Leaves
Your plant is ready when the trichomes, the small crystal structures on the buds, shift from clear to milky white, with some turning amber.
Use a jeweller’s loupe or a small digital microscope to check. Cut at the base, trim the large fan leaves, and hang upside down in a dark, ventilated space to dry for 7–14 days.
Step 6: Dry and Cure Your Harvest
Drying and curing are where most first-time growers lose the quality they worked weeks to build.
After hanging your trimmed branches for 7–14 days at around 18–21°C with 45–55% humidity, the outside of the buds should feel dry to the touch while the inner stems still have a slight give when bent.
Once dry, transfer to airtight glass jars and store in a dark, cool location. For the first week, open the jars once or twice a day for a few minutes to release moisture and exchange air.
This is called burping. After the first week, burp every few days for the next 2–3 weeks.
A proper cure of 2–4 weeks noticeably improves smoothness, flavor, and potency. Harvesting correctly but skipping the cure is one of the most common ways to undercut an otherwise strong grow.
Smell check: When you open the jar, it should smell sweet or earthy. A moldy or ammonia smell means moisture is still too high. Remove the lids for several hours, let the buds breathe, then re-jar and continue curing with more frequent burping.
How LED Grow Lights Work?
Plants don’t need the full spectrum of sunlight; they need specific wavelengths, primarily red (630–660nm) for flowering and blue (430–450nm) for vegetative growth.
LEDs are engineered to emit exactly those wavelengths, which is why they’ve replaced older lighting technologies in modern indoor grows. Unlike HPS or fluorescent lights, LEDs convert electricity into usable light with minimal heat waste, keeping your environment easier to manage.
The number that matters most is PPFD, Photosynthetic Photon Flux Density, measured in µmol/m²/s.
Think of it as the volume of usable light landing on your canopy per second. PPFD is the number everything else is built on.
Choosing the Right LED Light
A light that’s too weak starves your canopy. A light that’s too strong burns it. The right choice comes down to three variables.
| Variable | What to Look For |
|---|---|
| Wattage | ~30–50W of true power per sq ft of canopy |
| Coverage | Match the manufacturer’s footprint, not the veg footprint |
| Type | Quantum boards > COB > blurple panels for most growers |
Quantum board LEDs (like those from HLG or Mars Hydro) offer the best balance of efficiency, heat management, and spectrum quality for home growers. Blurple panels are cheaper but less efficient and harder to dial in.
One thing worth noting for beginners: the wattage on the box is usually the maximum draw, not the operating draw.
A “300W” blurple panel often runs closer to 130W. Always check the actual power draw spec before buying, and cross-reference the PPFD map if the manufacturer provides one. A reputable brand will list both.
Feeding and Watering the Plant
Cannabis needs three macronutrients: nitrogen (N), phosphorus (P), and potassium (K). The ratio shifts across the growing high N in veg, high P and K in flower.
Most bottled nutrient lines are formulated around this, and the label will tell you the schedule. Feeding demands also vary by strain. A fruity sativa-leaning plant will run hungrier through flower than a compact indica or an autoflower.
The 50% rule: Most nutrient labels suggest doses that are too strong for a single plant in a small setup.
Start at 50% of the recommended dose and increase from there only if your plant shows signs of deficiency.
It is far easier to add more later than to flush out a nutrient buildup. This single habit prevents more problems than anything else I teach in beginner workshops.
Some basics for you to remember:
- Frequency: Water when the top 2–3cm of medium is dry. Overwatering is the most common beginner mistake.
- Volume: Water until you get 10–20% runoff from the bottom of the pot.
- pH: Always pH your water before feeding. Soil: 6.0–7.0. Coco/hydro: 5.5–6.5. A wrong pH locks out nutrients, regardless of how much you feed.
Get these three right consistently, and your plant will rarely show stress from the roots up.
Common Problems and Fixes
Most beginner growers don’t fail from lack of effort; they fail from the same three recurring issues. Here is how to spot and fix each one:
- Stretching: Light is too far or too weak. The plant reaches upward toward the source. Lower the fixture or increase intensity.
- Yellowing: Check pH before touching nutrients. Lockout mimics a deficiency. Natural fading of late flowers is normal and not a cause for concern.
- Light burn: Bleached or upward-curling leaves at the canopy top. Light is too close or too intense for the stage. Raise the fixture.
- Nutrient burn: Brown or burnt leaf tips, usually appearing first on the newest growth. Dial back feeding to 25–50% of the current dose and flush with plain pH’d water.
This is almost always caused by overfeeding, not underfeeding. Most beginner nutrient errors go in this direction. - Overwatering: Drooping leaves that look heavy rather than crispy, combined with slow growth. Let the medium dry out more between waterings.
Pick up the pot before and after watering to develop a feel for weight-based moisture reading. It sounds simple, but it works.
Catching these early makes the difference. Most fixes take under five minutes once you know what you are looking at.
Factors Driving your Yield
Yield is not a lucky outcome; it is a predictable result. These four variables explain why two growers with identical setups can finish with very different harvests.
- Light quality and consistency: PPFD in the right range, maintained throughout flower
- Environmental stability: Swings in temperature or humidity directly stress the plant and reduce output
- Genetics: Strain selection sets the ceiling. A beginner strain grown well will outperform a premium strain grown poorly
- Grower consistency: Missed waterings, pH drift, and late-stage changes compound over a 10-week grow
Yield is not one thing you get right; it is the sum of everything you did not get wrong.
Sample Small Room Setup (60×60cm Tent)
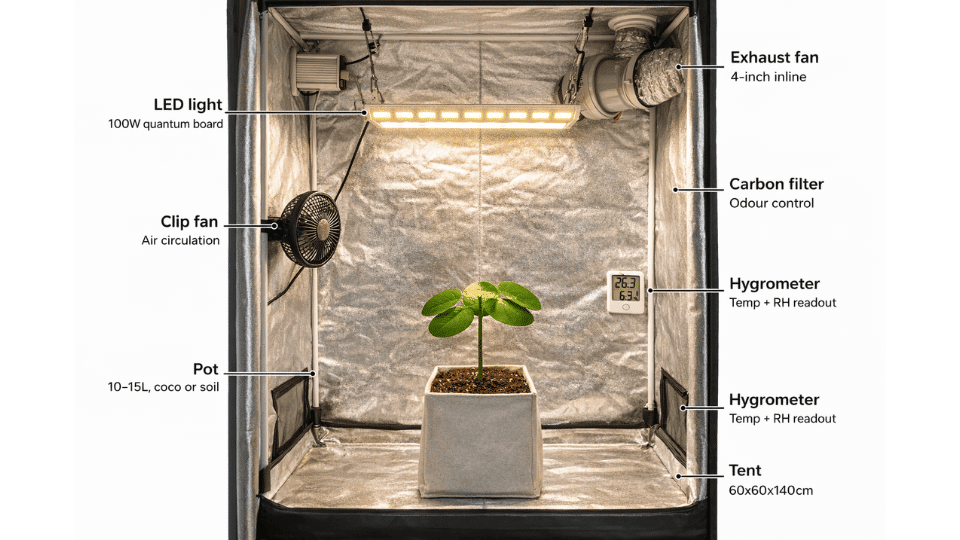
| Item | Spec |
|---|---|
| Tent | 60×60×140cm |
| LED | 100W quantum board |
| Exhaust fan | 4-inch inline with carbon filter |
| Circulation fan | Small oscillating clip fan |
| Medium | 10–15L pot, coco or soil |
| Hygrometer | Digital, with temp readout |
A 60×60cm tent is the most forgiving starting point for a first grow.
The 100W quantum board covers the footprint without overwhelming a single plant, and the 4-inch exhaust paired with a clip fan gives you enough airflow control to keep temperature and humidity stable.
The hygrometer is non-negotiable; you cannot manage what you cannot measure.
Bottom Line
A good grow is rarely the result of one great decision; it is the result of a hundred small ones made consistently. Light placement, feeding schedules, humidity checks, and training early enough to matter.
None of it is difficult in isolation. The challenge is holding it all together across ten to twelve weeks without cutting corners.
From understanding what LEDs actually do, to reading your plant at each stage, to knowing what separates a 20g harvest from a 100g one, the pieces are all here now.
The rest is repetition. Each growth teaches you something the last one could not. If any part of this raised questions or you want to share how your first run went, drop a comment below.